How does CV Generation work on this site?
If you're browsing this site at the moment, It's likely because you're checking out my CV. You might have noticed that my CV is generated in real time when you access it. It even has a "Generated At" stamp in the footer (pictured below). This blog post is going to go into some of the technical details as to how that works.

SvelteKit Endpoint
The site is built using SvelteKit, a web app framework built on top of Svelte. SvelteKit allows you to quickly create both API and frontend endpoints based on filetype. It also allows param urls such as cv/[id].pdf.ts where id is supplied to the Typescript endpoint.
We can also do some simple security fixes here by stripping out anything from that id that could be harmful at the start of our endpoint code like so.
/** @type {import('@sveltejs/kit').RequestHandler} */
export const get = async ({ params, url }) => {
  const id = params.id.replace(/[\W_]+/g," ");
  if(!id || id.length !== 24) return {status: 404, body: couldNotGenerateError(id || 'undefined')};
  const user = await fetchUser(id);
  if(!user) return {status: 404, body: couldNotGenerateError(id)};
As seen above id is supplied as part of the params object. We use regex to force that into being alphanumeric with underscores and then check that it's length is equal to 24. This is because MongoDB ObjectIds are 24 character hexadecimal strings and we'll need to fetch my user details from my MongoDB database.
Given that this is only my own CV, you might think this is overkill but, I always try to build my personal projects to be scalable. If for example, someone I knew wanted to add their CV to my generation system, it would be a matter of minutes to do so.
The way SvelteKit works, our get handler, can return a JSON object, with a status and a body. We can also set headers, which is important because we're going to be doing something we're not really meant to and sending binary data as the body. We need to set the header to inform the browser of the mimetype being PDF so that the browser can handle.
return {
    body: pdf,
    status: 200,
    headers: {
      'Content-Type': 'application/pdf',
      'Content-Length': Buffer.byteLength(pdf),
      'Content-Disposition': `inline; filename="${user.givenName} ${user.familyName} - CV ${format(new Date(), 'yyyy')}.pdf"`
    }
  }
Generating the PDF
To actually generate the PDF, I made use of a library called pdfmake. This library is designed for generating PDF files as part of node processes and actual spits out a Stream. Unfortunately SvelteKit doesn't currently support return streams (source) so I had to do some messing around to convert it into a buffer that could be used above.
The first task was to get a blank pdf generating, I could add the user details later but at this point, I passed in a blank docDefinition (The Typescript definitions on this were a bit funky so I had to as any it) and created a new promise that would resolve when the buffer was complete.
const pdf: Buffer = await new Promise((resolve) => {
  const printer = new PdfPrinter();
  const cv = printer.createPdfKitDocument(docDefinition as any);
  cv.on('data', (chunk) => buffers.push(chunk));
  cv.on('close', () => resolve(Buffer.concat(buffers)));
  cv.end();
});
Now that I had a blank pdf generating, it's just a case of creating a JSON object that PdfMake can use from my user info.
Generating user pdf JSON
To be completely honest with you, at this point I got sidetracked and spent some time on Google Fonts looking for a font I liked for the PDF. I ended up using the same font across the site once I settled on Outfit. Unfortunately, in order to use custom fonts with PdfMake, you have to have them available locally soI downloaded the font and put them in the static folder to access in my fonts object.
const fonts = {
	Outfit: {
    normal: './static/fonts/outfit/Outfit-Regular.ttf',
    bold: './static/fonts/outfit/Outfit-Bold.ttf'
  },
};
We can pass this fonts object when we define our PdfPrinter to load them in but it took a while to debug a couple of issues I ended up having with my font files.
const printer = new PdfPrinter(fonts);
Next thing to do was to set up a default text style, this involved updating the docDefinition object to have some basic info for the pdf.
const docDefinition = {
	defaultStyle: {
    font: 'Outfit',
    lineHeight: 1.1,
    color: "#232b2b",
    fontSize: 12
  },
  styles: {
    header: {
      fontSize: 28,
      bold: true,
      margin: [ 0, 0, 0, 10 ],
      color: "#0e1111"
    }
  }
}
We can also add named styles that make things easier to apply later on, just for example, I added my header style to our example docDefinition above. As you can see, it's very similar to CSS in JS as you might have experienced with a few front end frameworks (thankfully, svelte allows full css/scss in your components).
For the actual conversion between user details and docDefinition I decided to split it out into it's own function. That way, my endpoint code wouldn't get too out of hand. With a bit of destructuring, it could be inserted into the docDefinition that would eventually be used for rendering.
const docDefinition = {
  ...userCVData,
  defaultStyle,
  styles
}
PdfMake needed to main parts as part of their doc definition type (called TDocumentDefinitions). info for meta data and content for the pdf body. Info is pretty simple as it doesn't need to do anything too configurable. So I did that first. For reference, page is the url of the site endpoint.
const info = {
  title: `${user.shortName}'s CV`,
  author: `${user.givenName} ${user.familyName}`,
  creationDate: new Date(),
  creator: page,
  producer: page
}
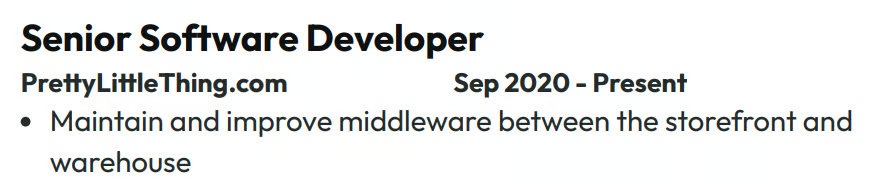
From there, it's just a case of following PdfMake's interface to create the format. I won't put it all in here because it can look a bit messy but I will include the section that creates the job history section as an example.
const jobs = user.jobs.sort((a,b) => a.startDate > b.startDate ? -1 : 1).map(job => [{ stack: [
  { text: job.position, style: 'jobTitle' },
  { columns: [
    { text: job.company, style: 'jobDetails' },
    { text: job.dateRange(), style: 'jobDetails'}
  ]},
  {
    ul: job.responsibilites,
    style: "jobNotes"
  }
]}])
Which for reference, generates a series of blocks like the following for each job.
Wrapping Up
I do also add some data caching, so I don't absolutely cane my webserver. While I'm comfortable enough with serverless, it just seemed a bit like overkill for this site. Overall, I'm really quite pleased with how this works. In the future, I'd love to make use of the streams directly but I have to wait for that feature in SvelteKit.
There's other improvements I can make, such as toggle-able CV components but that's mainly only going to be useful if I extend cv generation to other people.